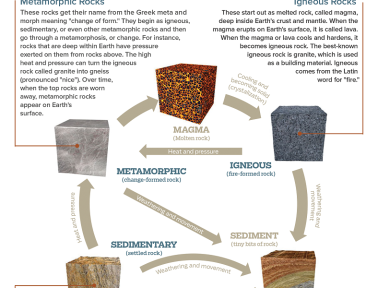

If you’re like me, you’ve discovered (and quickly become addicted to) this wonderful, mysterious new thing called Pinterest. I often find myself pinning things, wondering how they’ll work out in my home with real kids, real quirks, and no real professional photographer. So I thought I’d give that to you. From time to time, I’ll share some of the Pinterest projects we’ve tried out, along with my own tweaks and tips. (Follow the links to the actual pins and sites for full directions.)
Since it’s Valentine’s Day, I’ll start with these Valentines I made with my boys from Stitch Craft Creations found on this pin. My boys loved them because Star Wars and Legos are at the top of their favorite things lists, and I loved that they were unique and used something other than candy. The down side: Those darn glow stick bracelets break much more easily than I had anticipated, which is why I ended up doing most of the assembling myself. So while it’s a great Valentine, it’s not so hands-on for the kiddos.
Tips: I started out cutting slits with an exacto knife, until I had an epihany and used a hole punch. Much easier, both for the cutting job and for sliding in the glow stick. Also, when you’re done take your box full (I figured a box would protect them more than a bag) into a dark room and make sure you haven’t activated any by mistake. No one wants an expired glow stick for Valentine’s Day! As a last tip, buy a few extra glow sticks just in case.
These Jello Roll-Ups (found on this pin from Joy of Jello) were a huge hit with the kiddos and uber-simple to make. Use caution of course with the hot liquid, but you could certainly have kids help with this quick prep, and have a science chat about solids and liquids while you’re at it. A definite repeat treat at our house!
Tips: Watch carefully to make sure you don’t let the Jello boil over in the microwave. This should go without saying, I know, but I did it TWICE. so I just thought I’d put it out there. Also, when I followed the directions on the recipe the rolls were smaller, almost bite-sized. To get these bigger rolls, I doubled the recipe and set it in a 9×13 pan. I rolled it up so that the roll before cutting was still only 9 inches long as in the directions, but had been rolled 13 inches instead of 9.
I’ve seen several pins floating around, all touting the same recipe for bouncy balls and using a photo showing the super-bounce variety from childhood fame. We followed this pin from Curbly. While it was a fun science experience, the balls looked nothing like those in the picture. My son grabbed his super bouncy ball from his drawer of treasures for the side by side comparison shown above. The differences didn’t end with appearance either. While fun to mix and mold, our home-made ball’s bounce would be called anything but “super”.
Tips: Approach this as a science experience. Following the procedure, mixing, observing, talking about changing states, and making comparisons between results and expectations are all parts of a great science experience. But if you’re looking for a secret homemade route to commercial grade super-bounce balls, this just isn’t it.
When I saw this pin for dry ice bubbles from Simply Modern Mom, I knew we would have to try it out. It was well worth the couple of bucks I spent on the dry ice! As the dry ice and water create vapor, you create a bubble across the top of the bowl. So inside the bubble, instead of the clear air we’re used to seeing, is smokey-looking vapor. Even more exciting than the huge bubble created was the cloud of vapor that came tumbling out as it popped!
We made the tiny bubble version explained in the directions, which was fun in the bowl, but became even more fun when we dumped it into our sink and added hot water! My youngest kept scooping up the bubbles and blowing them, releasing exciting pops of smokey vapor.
This was a great opportunity to talk about the difference between smoke and vapor and to discuss the properties of different states of matter and a really enjoyable way to encourage inquiry and curiosity. We loved it!
Tips: Remember that dry ice should never be touched directly, but the vapor in the bubbles is completely safe. For best results with the giant bubble, be sure to apply downward pressure as you drag the yarn across the bowl, to make sure you’ve created a completely sealed bubble.
So there you have it! Just a few of our adventures in Pinterest!
Have a wonderful Valentine’s Day!
<!–
–>